MICTECHNG

Tuesday, October 30, 2018

Install macOS Mojave on Mac Direct Download

Install macOS Mojave on Mac Direct Download

Install macOS Mojave on Mac [Direct Download]

Apple has just published the release version of macOS Mojave on the Mac App Store. But over the first few days of release, users are likely going to face various issues while trying to update macOS through the MAS.
Install macOS Mojave on Mac (Direct Download)
As with previous releases, high traffic and an overwhelming number of update requests on the Apple server may cause the process to be quite frustrating, attributed by slow download speeds, frequent disconnections, and inability to resume the download.
Since these updates are usually pretty large in size, the multiple attempts to download the update may significantly impact your data plan, especially if you’re on a metered connection.
In this article, we’ll explore a way to download macOS Mojave directly from the Apple server instead of via the MAS, using your favorite web browser or a download accelerator.
If you’re using a download accelerator like Folx to download macOS Mojave, you can take full advantage of their multi-threaded approach to achieve higher download speeds, as well as the ability to resume interrupted downloads.

Download and install macOS Mojave without MAS

Normally, when you download macOS Mojave (or any other macOS release) from MAS, some package files are downloaded to your computer, and then processed by MAS, to convert them into an executable “.app” file. You cannot install macOS directly from the raw package files.
In this workaround, we’re going to directly download these raw packages from Apple server using a web browser or a suitable download accelerator. Then, we’ll configure the computer in such a way that Mac App Store processes the package files by fetching them from the local directory on your computer (Mac), instead of downloading it again from Apple.

macOS Mojave Direct Download

Step 1: Download the three “.pkg” files from the respective URLs given below.
macOS Mojave 10.14 (18A391) / September 24, 2018
  1. macOS Mojave InstallESDDmg.pkg file download URL: http://swcdn.apple.com/content/downloads/49/44/041-08708/vtip954dc6zbkpdv16iw18jmilcqdt8uot/InstallESDDmg.pkg
  2. macOS Mojave RecoveryHDMetaDmg.pkg file download URL: http://swcdn.apple.com/content/downloads/49/44/041-08708/vtip954dc6zbkpdv16iw18jmilcqdt8uot/RecoveryHDMetaDmg.pkg
  3. macOS Mojave InstallAssistantAuto.pkg file download URL: http://swcdn.apple.com/content/downloads/49/44/041-08708/vtip954dc6zbkpdv16iw18jmilcqdt8uot/InstallAssistantAuto.pkg
Step 2: Configure your Mac so that MAS looks for the macOS packages locally instead of from the Apple server.
To do this, you need to edit the hosts file on Mac to point the root domain of the download URLs (“swcdn.apple.com”) to localhost (“127.0.0.1”). The below instructions will guide you to modify the hosts file as required.
  1. Launch Terminal on your Mac from Launchpad or Applications list.
  2. Type in the following command: “sudo nano /etc/hosts”
  3. Provide the System Password when prompted. The hosts file is now open in editable mode within the Terminal window.
  4. Append the following line to the end of the file: “127.0.0.1       swcdn.apple.com”.
  5. Press control + X (^X), then Y and hit return to save the file and return to Terminal prompt.
From now on, any request issued for the particular root domain (swcdn.apple.com) from the Mac will be directed to localhost.
Note: Sometimes, you might need to flush the DNS cache for the changes to take effect. In that case, use the “sudo killall -HUP mDNSResponder” command to flush DNS cache.
Step 3: Place the package files in a certain relative path from the localhost root, so as to mimic the structure of their respective download URLs.
In this example, we’ll create a folder named “macos_local” on Desktop, and replicate the directory structure of the package URLs under the same. Once the relative path has been created, we’ll configure the localhost server to point to the “macos_local” directory on Desktop. Then, we’ll use macOS’ built-in SimpleHTTP server convert the folder into a web server directory.
The below instructions will guide you through the setup process.
  1. Open Terminal from the Launchpad or Applications list.
  2. Type “cd Desktop” on the command line and hit return to enter the Desktop folder.
  3. Type “mkdir macos_local” and hit return to create the root directory of the same name on Desktop.
  4. Go to the newly created folder by typing “cd macos_local” and hitting return.
  5. Enter the following command to create the relative path for the .pkg files, inside the macos_local folder (Provide the admin password when requested):
“sudo mkdir -p ./content/downloads/49/44/041-08708/vtip954dc6zbkpdv16iw18jmilcqdt8uot/
  6. Place the downloaded package files in their respective relative location (as per their URLs) within the macos_local folder on the Desktop. Click on Authenticate when prompted, and provide the system admin password.
  7. With macos_local as the present working directory in Terminal, execute the following command: “sudo python -m SimpleHTTPServer 80”. Provide the admin password and click on Allow in the subsequent message prompt.
The current directory (macos_local) is now hosted on localhost. Leave the Terminal window open to keep the localhost server running until the process is completed.
To verify the setup, click on any of the package (.pkg or pkg) URLs in your browser and check the download speed as it downloads the package. You may notice a very high-speed download (which is much higher than the speed of your Internet connection). This is because the file will be downloaded through localhost; your Internet bandwidth won’t be used.
Step 4: Download macOS Mojave through the Mac App Store link.
Don’t worry. Since you’ve redirected the package download URLs locally, MAS will fetch the package files from localhost and launch the installer (“.app”) file once the packages have been processed.
Note: Your Mac might request resources from the “swcdn.apple.com” domain while installing macOS Mojave Thus, it is recommended to remove the entry from the hosts file that we appended earlier, before proceeding with the installation.

Is the workaround genuine?

In this workaround, we are downloading the required resources from the Apple Server and using the Mac App Store to install the OS update. So yes, it is as genuine as the official method. The only factor we’re changing here is the location where MAS fetches the packages from. If you are downloading the macOS package files from third-party sources, you can verify whether it’s the original, by comparing their MD5 and SHA1 hash values given below.
InstallESD.dmg
MD5: e603e94dd99241bab4938a7f0334ba1bSHA1: d29afb53d32d350453356d6025c4cbb2fb123985

macOS Mojave Bootable Installer (macOS Mojave DMG)

Now that you have the “macOS Mojave.app” installer, you can upgrade multiple Macs to the latest version using the same file. However, if you are looking to perform a fresh installation, you need to create a bootable installer for Mojave.
The bootable image for Mojave (InstallESD.dmg) is located within its “.app” file. To get the InstallESD.dmg file, right-click on “macOS Mojave.app”, select “Show Package Contents” option, and browse to the “Contents/SharedSupport/” folder.
Alternatively, the bootable installer for macOS Mojave may be directly created from the “.app” file using the “createinstallmedia” command, as suggested by Apple.
If this workaround has helped you to get macOS Mojave easily or saved your Internet bandwidth on single or multiple installations, let us know in the comments below.

Saturday, February 24, 2018

How To Root Tecno Camon CM


How To Root Tecno Camon CM And Install Twrp Recovery, to be able to enjoy your Android smartphone is advisable you root your phone to gain superuser or root access, so that you can be able to customize your phone the way you like and the way it pleases you. Before we continue i will like to state some advantage and disadvantage of rooting your Android smartphone without wasting much of our time lets continue quickly below.

Advantage Of Rooting Your Smartphone

  • Battery Life and Phone Speed Boosting
  • Phone Back Up for Seamless Transitions
  • Ads Can Be Blocked in Any App
  • Get Rid of Preinstalled Crapware
  • Custom ROM Flashing
  • Tweak all Android Dark Corners
  • Custom Kernel Flashing
  • Rooting to Unlock The Full Potential Of Your Android Phone
To Root Tecno Camon CM we are going to using the TWRP Recovery method via Flash Tool Mode. Its highly recommended that you you read and follow all the instruction in this post to avoid bricking your smartphone.
REQUIREMENT TO ROOT TECNO CAMON CM

Feature Of The TWRP Recovery

1. NVRAM backup
2. boot.img backup
3. Recovery.img backup
4. Uboot backup
5. Emmc repair
6. Recovery.img and boot.img install/flash
7.more features now working.
8.Most features are working
9. TWRP features working correctly…
Disclaimer
We are not responsible if you brick your phone at the process of flashing the recovery

 Install Recovery On Tecno Camon CM

  1. Connect your device to your PC
  2. Send the SuperSu to your external memory card
  3. Discount and put your Phone off
  4. The Tecno Camon CX TWRP Recovery you downloaded unzip it on your desktop
  5. Launch your Sp Flash Tools
  6. Click load the scatter file from the Sp Flash Tools
  7. Navigate and select the Android_scatter.txt file in the unzip TWRP folder
  8. Then tick just recovery in the Sp flash tools
  9. In the select option on Sp flash tools put Download  only
  10. Click Download
  11. After doing the above Connect Your switched off device (with battery inside) to the PC via USB cord
  12. A progress bar should start running
  13. Wait till you get a Success message (green circle with OK), do not interrupt before then
Vola you have successfully flash recovery on your device, so next thing to do is to Root Tecno Camon CX, please use the SuperSu provided in this post other versions of SuperSu may not work for you.

How To Root Tecno Camon CM

Immediately after flashing your recovery
  1. Boot to recovery mode (power off your device then Hold power button and Volume Key same for five Sec.)
  2. In the TWRP mode, it may ask you to swipe to allow modification of System partition, tap Read Only.
  3. If its offer to root the phone, select No
  4. Click install on your recovery then navigate to the storage you have your Magisk  SuperSu.zip select it to root your device
  5. After Flashing navigate back and reboot
Congratulation your are rooted
Now Enjoy Your Rooted Device
TWRP Tecno Camon CM Recovery

Wednesday, February 14, 2018

How to Install Android Oreo on the Samsung Galaxy S8/S8+


After a long wait and many beta releases, Samsung has finally released its official Android Oreo update for the Exynos Samsung Galaxy S8 and S8+. This is the first stable release of Android 8.0 for any Samsung devices, and it brings a plethora of new features and improvements. On top of all the new features that come with Android Oreo such as picture-in-picture mode, notification channels, background app optimizations, notification snoozing, and more, there are also plenty of Samsung-specific changes with Samsung Experience 9.0.
For instance, there is the new keyboard with stickers and GIFs built in, the App Pair feature from the Samsung Galaxy Note8 (which has yet to receive its own official Oreo release), and many more. The build comes with the latest February security patches so you can be rest assured that your phone is patched against all of the known major security vulnerabilities including BlueBorne, KRACK, and Spectre/Meltdown. Finally, for members of our forums, you should also know that the update includes native support for OMS, the theme engine behind Substratum. Previously, you would have to use the Sungstratum plugin to apply beautiful themes, but with OMS theme support should be much more stable than before.
All of that sound good? Want to install the update on your Samsung Galaxy S8 or Galaxy S8+ Exynos models right now? If so, then you’re in luck. Some members in our forums were able to pull the update which allows you to install it via the stock recovery. Below are instructions and links on how to install the official Android Oreo update for your Exynos Galaxy S8/S8+! If you are worried about security and if this build is legitimate, then don’t worry, because the stock recovery is not able to install unofficial OTA updates so that guarantees these builds are the real thing!
This update is probably going to roll out within the next couple of days or even weeks, so following this tutorial will ensure that you can upgrade your device to the latest Android 8.0 Oreo build right now. This tutorial will work on almost all Exynos Galaxy S8 and Galaxy S8+ devices except for Korean and Duos Exynos users.
A word of warning: if your phone is currently running Android Nougat, then this should go smoothly. However, if your phone is running one of the Android Oreo betas, then following this method will require a factory reset/data wipe. We recommend backing up important data regardless.

How to Install Android Oreo on the Samsung Galaxy S8/S8+ (Exynos)

1. Check your phone’s model number to see if its G950F (Galaxy S8 Exynos) or G955F (Galaxy S8+ Exynos). These models are the only ones which can flash the Oreo builds that are available now. If you do not have either of these models, do not proceed.
2. If you have a G950F then download these files: AQL5 Odin and AQL5 to CRAP. If you have a G955F model then download these files: AQL5 Odin, AQL5 to ZRA5, and ZRA5 to CRAP. (No, that’s not a typo, the build number of the official Oreo update really is “CRAP!”)
3. Copy the OTA file onto the SD Card on your phone. If you don’t have an SD Card, don’t worry as you can skip this step but you will still need the OTA file on your computer.
4. Extract the Odin firmware linked earlier. It will be in a zip format.
5. Reboot your device into download mode by powering off your device then holding the Bixby button + Volume down + power.
6. Download the Odin tool and plug in your phone to your computer. Odin is an official tool from Samsung that can flash official Samsung firmware onto Samsung Galaxy devices. In Odin on the right side, you will see 5 sections, but only 4 of those will be used.
7. Click the BL button and navigate to your Odin firmware folder where you extracted your files, and then click the file starting with BL. Do the same for AP, CP, and HOME_CSC
8. Click start at the bottom of Odin.
9. Wait for your device to flash and then reboot. As soon as it reboots, power off your phone again. Then, boot into recovery once more by holding down the Bixby button + Volume up + power.
The next steps will differ depending on what model you have. Please proceed to the right set of instructions for your particular model.

Samsung Galaxy S8 (G950F)

10. If you have an SD card, select “apply update from SD card.” You can select this by using your volume rockers to navigate and the power button to select. After selecting that option, find the file called “update.zip” and select it with the power button.
11. If you don’t have an SD card, select “apply update from ADB” and then on your computer open a command prompt by pressing Windows key + R and typing “cmd.” Once this command prompt open up, then type adb sideload <path to file update.zip> and hitting enter. If you don’t already have ADB set up, then you can follow these quick set of instructions to get up to speed.

Side-loading official Android Oreo update on the Samsung Galaxy S8

Samsung Galaxy S8+ (G955F)

With SD Card

10. Select “apply update from SD card.” You can select this by using your volume rockers to navigate and the power button to select. After selecting that option, find the file called “G955F AQL5 to ZRA5.zip” and select it with the power button.
11. Wait for your phone to reboot then it will be running Android Oreo beta 6. Now to get to the official Android Oreo release, power off your phone again and reboot into recovery by holding the Bixby button + Volume up + Power and selecting “Apply update from SD card” then select the file “G955F ZRA5 to CRAP.zip”. This will install on your phone and you will be running official Android Oreo!

Without SD Card

10. If you don’t have an SD card, select “Apply update from ADB” and on your computer open a command prompt by pressing the Windows key + R and typing “cmd.” Then, enter adb sideload <path to file G955F      AQL5 to ZRA5.zip> in the command prompt.
11. If you don’t have an SD card, wait for your phone to reboot and then it will be running Android Oreo beta 6. To get to the official 8.0 Oreo release, power off your phone and then reboot into recovery again by holding Bixby button + Volume up + Power. Then select “Apply update from ADB.” Finally, in the command prompt type adb sideload <path to file G955F ZRA5 to CRAP.zip>
Side-loading official Android 8.0 Oreo on the Samsung Galaxy S8+

How to update with Odin:

1. Check your phone’s model number to see if its G950F (Galaxy S8 Exynos) or G955F (Galaxy S8+ Exynos). These models are the only ones which can flash the Oreo builds that are available now. If you do not have either of these models, do not proceed.
2. If you have a G950F then download this file: CRAP Odin . If you have a G955F model then download these files: CRAP Odin. (No, that’s not a typo, the build number of the official Oreo update really is “CRAP!”)
3. Extract the Odin firmware linked earlier. It will be in a zip format.
4. Reboot your device into download mode by powering off your device then holding the Bixby button + Volume down + power.
5. Download the Odin tool and plug in your phone to your computer. Odin is an official tool from Samsung that can flash official Samsung firmware onto Samsung Galaxy devices. In Odin on the right side, you will see 5 sections, but only 4 of those will be used.
6. Click the BL button and navigate to your Odin firmware folder where you extracted your files, and then click the file starting with BL. Do the same for AP, CP, and HOME_CSC (Do not use CSC_XXX It will erase your data)
7. Click start at the bottom of Odin.
8. Enjoy Android Oreo!

And that’s it! Now your Exynos Galaxy S8/S8+ models should be running the official release of Android Oreo! You didn’t even have to wait! Your device will be able to accept official OTA updates in the future, and KNOX will be intact too. Enjoy!

Saturday, January 27, 2018

How to transfer music to an iPhone without using iTunes


For some reason, there is this weird notion about using iTunes. People automatically assume that it is difficult to use even before giving it a shot. Once you get used to it, you'll know it is one of the most convenient media players out there that actually organises your files. But having said that, iTunes is also one of the most annoying ways to transfer music to your iPhone. 

The moment you have to transfer new songs to your iPhone or iPad you realise how troublesome it is. Well thanks to the advancements, we now can transfer any kind of files to our iPhones without the use of iTunes.


Use Music streaming apps : To keep yourself updated with new music it is always better to use one of the music streaming apps. Apple has its own 'Apple Music' and once you have the subscription, Apple Music will refresh its data often to provide you with fresh content. If you have enough storage on your device, you can also download songs for offline listening. Note that the songs downloaded will only be available for offline listening and not a hard file that you can transfer somewhere else.

Local media players : Local media players like VLC don't write the data to core iOS library. It stores all the files in the app storage. Transfers can be done by drag and drop using the web browser and Wi-Fi, or cloud storage. You can also use AirDrop to send files to your phone and choose the app you want to use to play the file later.

Cloud Storage : Storing files and data on iCloud has by far been the easiest way to keep your files for access. You can do the same with all your music files. Once you store them on your Cloud Storage you won't need iTunes to copy the music files to your phone. All you have to do is login to your storage account and download the songs you want.

External Storage flash drives : Companies like SanDisk have come up with flash drives with lightning connector on one end and a normal USB type A on the other. This will allow you to connect the same drive to your phone and to your PC. All you have to do is download the compatible app to access the drive on your phone. Once you've copied files to the drive, connect it to your phone. After opening the app, you'll be given an option to back up the phone files on the flash drive, you can choose to opt out. But it will also give you an option to copy the files on the drive to the app. These files copied from the drive will be stored on the app storage and you can access them anytime you like.

Friday, January 26, 2018

How To Download Videos From Any Website For Free Without Any Software

How To Download Videos From Any Website For Free Without Any Software
Hello Everyone,Internet Is Full Of Media Like Songs,Videos,Games Etc.Many Of Us Love To Download These All Thing  From Internet.But On Many Website There Is No Option To Download Videos Or Songs.
So Today In This Trick.I Will Show You All That How To Download Vidoes From Any Website For Free Without Any Software.
How To Download Videos From Any Website For Free Without Any Software
So Lets Starts….)
  1. Visit http://www.videograbber.net/
  2. Now Paste The Link Of The Video.(If You Are Using It 1st Time You Have To Download And Install One Small Software In Your System.)
  3. Now Paste The Link And Click On Download
  4. And Now Choose The Video Quality Which You Want To Download
  5. Now Your Downloading Will Be Start.
You Can Also Use This Site To Convert Video And Record Screen Of Your Computer.
Note: Above Trick Is Tested On Many Sites And It Was Succesful.Many Be This Trick Will Not Work On Some Site Becuase Many Website Has There Own Policies That They Want Their User To Download Video Or Not.Above Trick Is Just For Educational l Purpose.

How To Make Free Calls From Internet

How To Make Free Calls From Internet
Hello Everyone,We All Use Phone Call Service In Our Day To Day Life.It Is Necessary Part Of Living Now-a-Days.Most Of The Time We Carry Our Mobiles With Us But Some Time Due To Some Reason We Are Not Having Calling Balance Or Recharge Issue In Our Cellphone.But Mostly Time We Have Acces To Internet Through Wifi And Other Extra Source

1st Trick Using Call2friends Service:
  1. Visit Call2Friends.com Site
  2. Enter Or Choose The Country Code For The Destination Number
  3. Now Enter The Number
  4. And Click On Green Button Or Click On Call Button
2nd Trick Using Evaphone Service:
  1. Visit ievaphone.com Site
  2. Enter Or Choose The Country Code For The Destination Number
  3. Now Enter The Number
  4. And Click On Green Button Or Click On Call Button
You Can Use Above Tricks To Make Free Call For 1 Minute.If You Want To Talk For More Time You Have To Buy Some Credits.You Can Make One Call In Day From 1 IP Adress.
So When Your 1 Call Credit Is Over Just Clear YourCookies And Change Your Ip Using Any Vpn Service And Call Again.

3rd Tricks Using Sendatext.co:
  1. Visit Sendatext.co Site
  2. Enter Or Choose The Country Code For The Destination Number
  3. Now Enter The Number
  4. And Click On Green Button Or Click On Call Button
3RD Tricks Sendatext.co Is Use For Calling And For Sending Text To.The Good Thing About Sendatext.co Is That U Can Make Unlimited Call In A Day But The Destination Number Should Not Be Same And Duration For 1 Call Is 3 Minutes.You Dont Need To Change Your Ip Or You Dont Require To Clear Cookies Everytime You Make Call.
Note: Above Information Is Only For Educational Purpose.You Should Not Use Above Service  To Disturb Someone Or To Play Prank.GETINTOPC.CO Is Not Responsible For Any Trouble Caused After Using Above Tricks.

Retrieve Your Deleted iPhone Data

Retrieve Your Deleted iPhone Data

Retrieve Your Deleted iPhone Data with Omni Recover [macOS]

Retrieve Your Deleted iPhone Data with Omni Recover [macOS]
These iOS data on your iPhone are vulnerable to sudden and casual iOS disasters. For instance, deleting photos on iPhone is permanent, and when you slide to delete a thread of message, there is no Junk bin for retrieving them. Now with Omni Recover you can have peace of mind knowing all your iPhone, iPad and iPod touch files are easily recoverable. By iPhone lost, stolen, water damage, to man-made accident, Omni Recover will give you a hand to recoup your lost iOS data, regardless of what the cause is.

Highlights of Omni Recover:

  • With industry leading iPhone data recovery capability, Omni Recover is able to retrieve up to 15+ forms of iOS data.
  • Whether you are a casual iOS data disaster victim, or you lost your device unfortunately, you can simply follow Omni Recover’s smart wizard to get your data back
  • By way of practice since 2013, Omni Recover is based on huge — and growing — table of iPhone data retrieval algorithms, which ensures the best possible opportunity to get your lost iOS information back
  • Unlike many iPhone Data Recovery utilities, Omni Recover goes much further by knowing how to analyze your iPhone/iTunes backup system with minimal data intervene, and how to precisely get the data you need without bringing in unnecessary operations.

Omni Recover Technical Setup Details:

  • Software Full Name: Omni Recover
  • Setup File Name: omni-recover-mac.dmg
  • Full Setup Site: 18.5MB
  • Version: 1.0.0 (built on 2017/11/15)
  • Developer: MiniCreo

System Requirement for Omni Recover:

  • Operation System: macOS 10.8 or later.
  • Memory: 512MB of RAM required.
  • Hard Disk Space: 200 MB of free space required.
  • Processor: 1GHz of processor or faster.

Free Smartphone Spy App for Android user 2018

Free Smartphone Spy App for Android user 2018

 Free Smartphone Spy Android App

The Internet has become a phenomenal technology, which has connected millions of people around the world without investing money into expensive devices and services. Smartphones have become very cheap ever since Android is offering a bulk license to the manufacturers for low-price.
With great technologies comes with greater problems. Children have access to the Internet, and we respect their privacy, but that very privacy can become a mess for your children.
Spy apps allow you keep an eye on your Children smartphone activities, which helps parents keep an eye on the children and help the parents.
How Snoopza works?
If you are a parent who has children using latest smartphones on a daily basis, then you should keep an eye on the kid’s activity because it can help them get out of the problem that may scar them for life.
You have to install Snoopza Spy App on the target smartphone, but remember it only supports Android any version.
Then you have to install Snoopza Program on your Windows-based PC, do not worry because it supports older Windows to a newer version of the XP, Vista, Seven, Eight, and Ten.Also Check TOP Android Hacking Apps.
Snoopza Features
You have two packages,
1 – Basic: It is a free version, where you get all basic features, but you have to go for Standard version for premium features.
2 – Standart : You get premium features, which are essential if you have a child, who is online most of the time.
Basic:
  1. Track Calls – You can track calls from the Snoopza program.
  2. Manage SMS – You can check, view, and copy the messages.
  3. TIH – You can track the internet history from the mobile browser.
  4. GeoLocation – The most important feature, you can track your child location.
Standard:
You get all basic features in this package.
  1. Record calls – Dialed and Received calls are recordable.
  2. Social Spy – You can view WhatsApp texts; Facebook chats, and Snapchats.
  3. Screenshots – You can take screenshots of the phone.
  4. Contacts – You can check and view the existing contacts.
  5. Track – You can track To-do list and camera.
  6. SIM – In case, if your Son or Daughter is changing SIM card, then the app will detect SIM card replaced.
Sign up & Install
We recommend you to test the free version of the Snoopza, before going for the premium version.
The whole transition is easy and simple to use, so you don’t have to worry about the complications.
Ther user-interface is easy to understand, and there are no unnecessary features that will challenge your technical knowledge.
Step 1: Go the official site from here.
Step 2: Login with your credentials, if you don’t have an account, then create a free account.
Step 3: Now use those credentials to log in from your smartphone.
Step 4: A download link will be available, which you can use to download the APK file.
Step 5: Once the download finished, then tap on the downloaded file.

Step 6: Now tap on “Settings.”

Step 7: Now you are on the security tab, and you have to tap on “unknown sources.”
Step 8: Make sure that “Only this installation” is ticked, if the feature is present, then once installation completed, then come back and uncheck it.

Step 9: Read all permission the app is asking for your children device.

Step 10: The Installation will begin.

Step 11: Select, for whom are you going to use the app.


Step 12: Once you have selected it, then tap on Ok.

Step 13: Now you have to accept the agreements, then click on OK.

Step 14: You have to enter the login credentials of the account.
We have tested the app for few minutes, and it gives you accurate information.
Tap on Device – you can see that your device model number is highlighted.

In the dashboard, you will be able to monitor your children activity even with the free version.But the features are limited.

Kaspersky Internet Security 2018 Free Download

Kaspersky Internet Security 2018 Free Download

Kaspersky Internet Security 2018 Free Download

Kaspersky Internet Security 2018 Free Download
Kaspersky Internet Security 2018 is a truly convenient application which will shield you in the majority of the Internet associated threats and permits one to get an even far more powerful browsing experience.
Kaspersky Internet Security 2018 has got a specific simple and quick installation procedure and this tool will install every one of those components automatically. It has got a simple and an easy to navigate interface to each one particular 3 av services and products as well as the primary modules might be retrieved out of your main menu by method of substantial buttons. Kaspersky Internet Security 2018 has got various different scanning ways which are CompleteQuick, Quick, Custom together with removable Drive scans. The entire update will examine each and every region of the laptop and is advantageous for performing whole check-up. Quick Scanning mode will scan no further than the critical components and essentially the most usually generated locations. In the Custom scanning mode you will define which folder or drive that you wish to scan along with the Removable Drives Scan mode evaluated outside disks. It also offers obtained a virtual computer keyboard which will make certain that the info protection against the stealthy key loggers. You may even like to down load Kaspersky Anti-Virus 2018.

FEATURES OF KASPERSKY INTERNET SECURITY 2018

  • Safeguards you from all of Internet related dangers.
  • Lets you’ve got a safer browsing experience.
  • Safeguards your PC against viruses, worms, rootkits and Trojans.
  • Got 4 different scanning modes.
  • Got a virtual computer keyboard to ensuring data protection against the stealthy key-loggers.

SYSTEM REQUIREMENTS FOR KASPERSKY INTERNET SECURITY 2018 FREE DOWNLOAD

  • Operating System: Windows XP/Vista/7/8/8.1/10
  • Memory (RAM): 1 GB of RAM required.
  • Hard Disk Space: 1 GB of free space required.
  • Processor: 512 MB of RAM required.
 Click To Dwonload

Microsoft Windows 10 Iso Free Download

Microsoft Windows 10 Iso Free Download

Microsoft Windows 10 Iso Free Download

Microsoft Windows 10 Iso Free Download
Windows 10 is an personal laptop operating system created and released from Microsoft as part of their Windows NT family of operating methods. It was first released on July 2-9, 2015. Unlike previous versions of Windows, Microsoft has Brand-Ed Windows 10 like a “service” that receives ongoing “attribute updates”. Devices in enterprise environments may receive these updates at a slower pace, or utilize long-term support milestones which only receive critical updates, such as security places, within their real life lifespan of lengthy aid.
Microsoft’s decision to provide a desktop-oriented interface in line with previous versions of Windows, contrasting the tablet-oriented approach of 8, even although Windows 10’s touch-oriented graphical user interface mode has been scrapped for containing regressions up on the touch-oriented interface of Windows 8.
Microsoft has claimed that Windows 10 is your best OS that’s ever been manufactured by this software giant. Subsequent to the release of Windows 10 higher than a year past it has develop in many different editions and updates.
This update has got an integrated . NET Framework 3.5 plus it has got editions like Windows 10 Home, Windows 10 Education and also Windows 10 Enterprise. This version contains got resizable tiles from Windows 8 and the startmenu has also been improved significantly. It has also obtained a exact gripping Cortana characteristic in which it is possible to easily set different alerts and record notes. This update has made an integrated language packs which are English and Russian.

Features of Microsoft Windows 10 Iso Download:

  • Got Windows 10 Home, Education and Enterprise etc..
    Retained resizable tiles from Windows 8.
    Enhanced Start menu.
    Got gripping Cortana feature.
    Got integrated language packs which are English and Russian.

System Requirements For Microsoft Windows 10 Iso:

  • RAM : 1 GB
  • Hard Disk Space: 16 GB
  • Processor: 1 GHz

Download os x yosemite with pc

Download os x yosemite with pc

Yosemite Free Download

Yosemite Free Download

Yosemite Free Download
Yosemite is the eleventh genuine entry of OS X from Apple for Mac PCs. It has everything that you can consider with an amazingly rich layout. OS X has been on changing tides consistently yet the norms remained same. Furthermore, the gauges are power, brilliance and straightforwardness. Mac OS X Yosemite has been made all the more competent and besides easy to use. The looks of the OS have been taken remarkable care of and each one of the gets and images have been upgraded.
Yosemite has a more cleaner and eye irresistible dock. There are packs of strategies for driving your applications yet dock I the most capable and smart way. Mac OS X Yosemite has made the dock more pleasing and easy to get to. The images of the applications on the dock are in a blaze obvious and has a relentless look and feel. The content styles of the OS have in like manner been upgraded remarkably and has been refined systemwide. There has been widened VoiceOver support for iBooks The scrutinizing and examining foundation in Safari has moreover been updated unimaginably. Web rotor examination has been made quick for Safari. The straightforwardness of the application can be adjusted by your necessities. Interpretation vernaculars have been extended and now you can coordinate in more than 40 languages.+

FEATURES OF  YOSEMITE:

  • Introduced with a very elegant design.
  • More powerful than before.
  • Easy to use.
  • Got more cleaner and catchy dock.
  • Extended VoiceOver support for iBooks.
  • Browsing and reading experience in Safari has been enhanced.
  • Application’s transparency can be adjusted.
  • Dictation languages have been increased.

YOSEMITE TECHNICAL SETUP DETAILS

  • Software Full Name: Yosemite 10.10 Build 14A389
  • Setup File Name: OS_X_Yosemite.dmg
  • Full Setup Size: 4.83 GB
  • Setup Type: Offline Installer / Full Standalone Setup
  • Compatibility Architecture: 32 Bit (x86) / 64 Bit (x64)
  • Latest Version Release Added On: 11th Jan 2014
  • License: Official Image for Mac
  • Developers:  Yosemite

SYSTEM REQUIREMENTS FOR  YOSEMITE

  • Memory (RAM): 2GB of RAM required.
  • Hard Disk Space: 8GB of free space required.
  • Processor: Intel Pentium 4 or later.
Click To Download

turn pc to full android operating system with remix os for free

turn pc to full android operating system with remix os for free

Remix Os Free Download

Remix Os Free Download

Remix Os Free Download
Remix OS is a now-finished PC working system for PCs with x86 and ARM structures that, former end of headway, sent with different first and untouchable devices. Remix OS empowered PC customers to run Android convenient applications on any impeccable Intel-based PC.
In January 2016 Jide revealed a Beta adjustment of their working structure called Remix OS for PC, which relies upon Android-x86 — a x86-port of the Android working system — and open for download for freefrom their website. The beta type of Remix OS for PC brings hard drive foundation, 32-bit reinforce, UEFI support and OTA revives. Except for the free programming approved parts open on GitHub, not under any condition like Android-x86, the source code of Remix OS is not available to the general population.
Google Mobile Services (GMS) were ousted from the Remix Mini after Remix OS Update: 2.0.307 which Jide attested was to “ensure a dependable difficulty over all Android contraptions for every.” Later comment prescribe that there was a closeness issue with a few applications which achieved Google requesting that GMS not be pre-loaded.On July 17, 2017, Jide detailed that change of Remix OS for PC, and moreover related client things being created, was being stopped, communicating that the association would be “reconstructing (their) approach to manage Remix OS and advancing a long way from the purchaser space”.Remix Os Free Download is framework for PCs with x86 and ARM structures.
Jide Technology, which effectively made it to news by making a Microsoft Surface-like tablet and furthermore a variation of Android for desktop PCs, investigated Tuesday its new Remix OS for Mobile which can change your Android wireless into a PC by partner it to a screen. The Remix OS for Mobile is Jide’s new custom ROM for Android, and which can offer Windows 10-like Continuum features.

                     CLICK HERE TO DOWNLOAD

Adobe Photoshop CC 2018 v19.1 Free Download

Adobe Photoshop CC 2018 v19.1 Free Download
Adobe Photoshop CC 2018 v19.1 is often a really handy and skilled device for seeing your own images. It’s tons of app using fully a Mercury Graphics engine which can turn your normal photo into some master slice. Adobe Photoshop is believed to become an absolute must own software to its expert musicians and designers. You are even permitted to download for free Adobe Photoshop CC 2017  v18.
Adobe Photoshop CC 2018 v19.1 has some exact excellent features which includes intelligent vehicle correction, HDR imaging, color controller, cartoonsand brushes, plus histogram palettes along with sprays. The expansion was improved drastically together with all the aid of most Mercury Graphics engine that enables consumers todo picture in addition to videoediting at a notable pace. You are even permitted to deal with the T One control within a very easy way by means of HDR imaging in addition to the toning. Overall each and every Adobe Photoshop CC 2018 v19.1 may be described as a awesome photo modifying instrument which is frequently properly used for seeing these images within an specific short fashion.

Features of Adobe Photoshop CC 2018 v19.1

  • hassle-free and skilled software of modifying your images.
  • Got lots of programs and also Mercury Graphics engine which may switch your photo into some master slice.
  • Allows stop users play with image and video screening to get the astonishing pace.
  • Can manage the T One control in just a very easy way by method of HDR firming and imaging.

System Requirements For Adobe Photoshop CC 2018 v19.1

  • Operating System: Windows 7/8/8.1/10
  • Memory (RAM): 2 GB of RAM required.
  • Hard Disk Space: 2 GB of free space required.
  • Processor: Intel Core 2 Duo or later.
  • Developers: Adobe

unlock all huawei sturborn wifi mtn,glo, airtel and all v4 e5573c


v4 unlocker software and calculator
get here

bypass blackberry 10.3.3 anti-theft made easy


With the release of the latest BlackBerry 10 OS version 10.3.3, your privacy and security are further enhanced with the introduction of Anti-Theft Protection within BlackBerry Protect.
Provided you have confirmed your BlackBerry ID, Anti-Theft Protection associates your BlackBerry ID with your device, and provides you with the ability to disable your device using a new Flag as Stolen option.
When used, Flag as Stolen will erase your device memory and disable your device, unless the BlackBerry ID which was used to setup the device originally with Anti-Theft Protection, is entered on the device.
In other words, unless your device is returned to you, no one else will be able to setupthe device again since they do not know your BlackBerry ID credentials. It was said you cant downgrade 10.3.3 when upgraded because of the security new patch level.  But however,i was able to discover a trick you can use to bypass/remove the anti theft protection without downgrade.

How to Remove Anti-theft on all blackberry 10, Leap, q10, q5, z10, z3, z30, passport 10.3.3  

1Download Latest BlackBerry OS 10.3.3.2049 Autoloader Here (optional) 

2. connect a working wifi network

3When on the Blackberry Anti-theft screen asking for email and password

4Input your working blackberry id and password if you don't have create one.

5Repeat the blackberry id 10-15 times

6Then power off and On the Device. (Restart)

7Connect wifi then setup the device  and the black berry Anti theft protection is Gone

8. Enjoy

Thursday, October 12, 2017

How do I hide my number when making outgoing calls?

How do I hide my number when making outgoing calls?
You can decide to hide your caller identification when calling somebody. This will ensure that the person receiving your call won’t be able to see your phone number and name.
Note that when sending text messages your caller identification will not be hidden.
Please also be aware that many smartphones have the functionality to block unknown numbers. If the person you are calling has enabled 'block unknown numbers' on their phone, you will not be able to call them.
Some network carriers and countries do not allow you to hide your number. If you have followed all the below steps and your number is still showing, you should check with your mobile network if they allow this feature.

1. Tap Phone
Phone 
2.  This step will differ slightly depending on the model of your phone.
If you have a newer model of phone, tap More (or three dots) on the top right corner
For older models, you will need to tap the Menu button on the bottom left corner of the device 
More  Dots  Menu 

3. Tap Settings or Call Settings
Settings   Menu Settings 
4. This step may differ slightly depending on the model of your phone.
If you are given the option to choose settings for either Call or Contacts, select Call.
If you do not see this screen, skip to step 5
Call  
5. Tap More Settings (you may need to scroll down a little) or Additional Settings
More Settings   Additional Settings 
6. Select Caller ID or Show Caller ID or Show my caller ID (this will differ slightly depending on your model)
Caller ID    Caller ID 2 
7. Select Hide Number
Hide Number

Wednesday, October 4, 2017

Where’s AirDrop in iOS11? We’ve Found it and More!

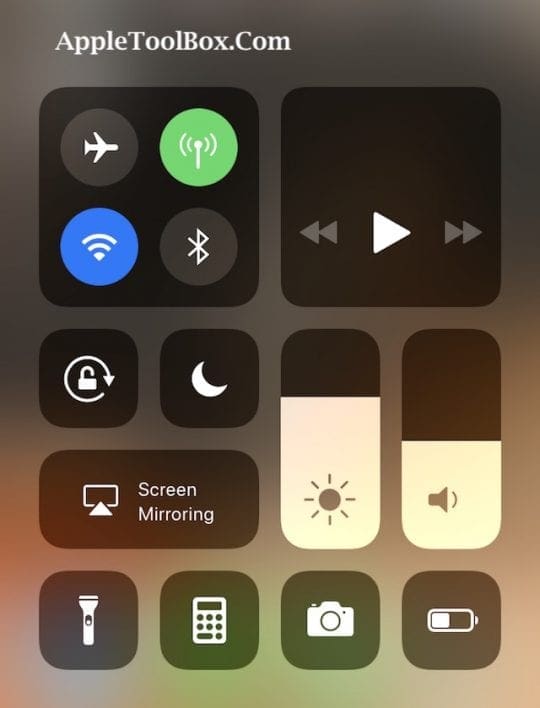
Looking for AirDrop in iOS11’s Control Center after updating and can’t find it anywhere? Well, we couldn’t find it either until we accidentally located it hidden in Control Center.


So here’s the scoop on AirDrop in iOS11

iOS 11 drastically redesigned (and for some folks, improved) Control Center. Instead of 2 pages, it’s back to a single screen center. It even includes features like Low Power Mode, and we’re finally able to do some customization via Control Center’s Settings. So adding toggles just got a heck of a lot easier.
But then there’s AirDrop. It’s been a staple of Control Center since I remember. But with iOS 11, it vanishes. It’s not there by default and it’s not there to customize. So yeah, where the heck is it hiding?

Customize iPhone Control Center using iOS 11

The answer is in 3D Touch

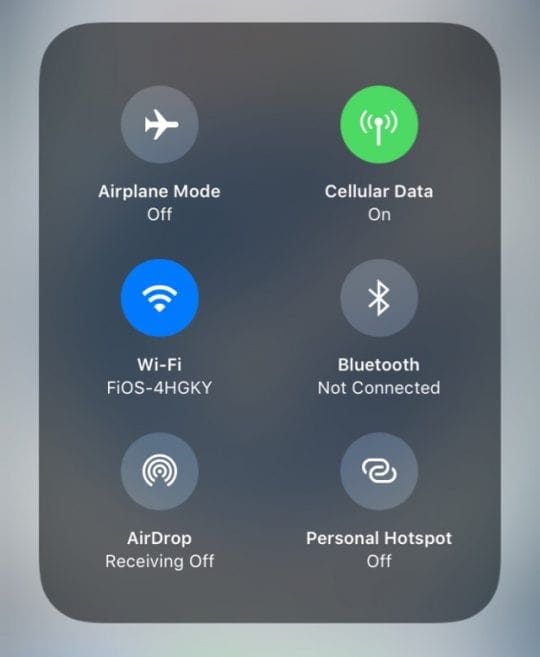
Yup, you heard right. AirDrop is now only accessible through a 3D Touch on any of toggles within the “connections” tile, including AirPlane Mode, WiFi, Cellular, and Bluetooth. Simply 3D Touch one of these icons and a larger menu pops up offering two additional selections: AirDrop and Personal Hotspot.
AirDrop in iOS11
For iPhones and iPads without 3D Touch, a deep press on these same icons (AirPlane Mode, WiFi, Cellular, or Bluetooth) brings up that same menu.
Don’t know why they decided NOT to include AirDrop (or Personal Hotspot) in Control Center’s customizable options, but they didn’t.

AirDrop’s Also Now in Settings

iOS 11 also has a new Settings Menu just for AirDrop. And it’s super easy to find. Go to Settings > General >AirDrop. Then set your AirDrop preference, choosing between Receiving Off, Contacts Only, and Everyone.

As a reminder, we recommend selecting Everyone–this selection gives us the most consistent results.

Night Shifted From Control Center Too!


Another missing item from iOS 11’s Control Center is Night Shift. To turn Night Shift on or off, 3D Touch or deep press the brightness slider. In the popup menu, tap the Night Shift icon at the bottom of the slider to turn it on or off.